
Hey there, X-700 users! Today we’re going to talk about one of the final cameras made for the Minolta MD/SR mount, the Minolta X-700. We’ll go over the basic features of the camera, what each button/dial does, how to load film into the camera, and what you’ll see through the viewfinder. We’ll also talk a bit about the benefits of the X-700 and things to look out for to make sure yours is working properly!
Without further ado, let’s get started! Click below to watch the video or keep scrolling for the text version of this Minolta X-700 guide!
Table of Contents
- History
- Preparing the Camera for Use
-
Features & Identification
- Rewind Knob, Exposure Compensation, & ISO Dial
- Viewfinder & Hot Shoe
- Shutter Speed Dial, Power Switch, & Shutter Button
- Film Advance Lever & Frame Counter
- Aperture Ring, Depth-of-Field Preview, & Program Lock
- Focus Ring & Hyperfocal Scale
- Self-Timer & Auto Exposure Lock
- PC Sync Port
- Lens Release Button, Threaded Shutter Release, & Depth-of-Field Preview
- The Bottom of the Camera
- Camera Operation
- The Viewfinder
- Common Issues & Conclusion
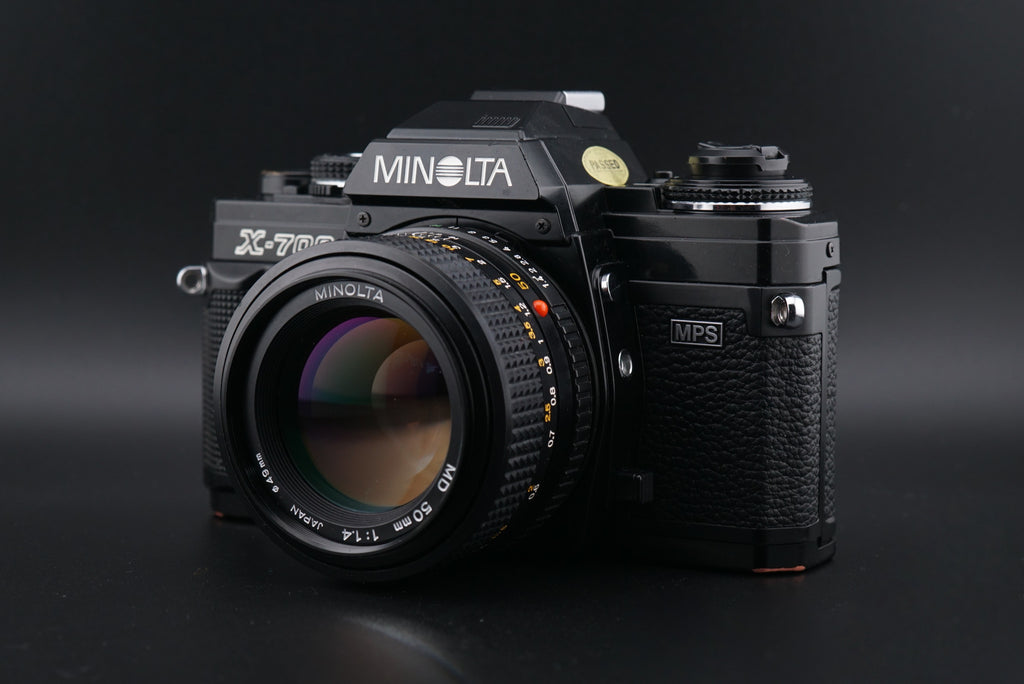
History
The Minolta X-700 came out in 1981 and was aimed squarely at the advanced amateur market. It sought to wrest control of the consumer market away from Canon and its recently-released AE-1 Program. Regardless of its commercial success or failure, the X-700 offered a feature-rich experience that, in many ways, surpassed the AE-1 and AE-1 Program. By many metrics, the X-700 was one of the most popular and well-received cameras Minolta ever produced. It even won European Camera of the Year in 1981!
The X-700 was notable in Minolta’s lineup for being a step forward and backward in different ways. While it was the first Minolta SLR to feature programmed auto-exposure, the materials used were definitely cheaper than on previous high-end Minoltas like the XD7. One obvious downgrade is the use of a horizontal cloth shutter instead of a vertical metal one. While the AE-1 and AE-1 Program both used cloth shutters as well, previous Minolta cameras had embraced the more accurate and reliable vertical metal shutters. These sacrifices were made to make the camera more budget-friendly and allow it to compete with the top dogs of the era.
Preparing the Camera for Use
Before you get shooting, there are a few things you should check on your camera. We have to make sure we have our lens mounted properly and a battery installed at the very least. Let’s figure out how to do that together!
Installing a Lens
The X-700 can use a wide variety of lenses, from fisheyes to portrait lenses to super telephotos meant to take photos of very small birds at very long distances. Before buying a lens, make sure it’s for Minolta’s MD/SR mount. Most Minolta lenses (unless they say “AF” on them) will work, but there are plenty of other options too. Companies like Tamron, Sigma, and Vivitar offer third-party lenses for the X-700 that could be great choices, especially on a budget.
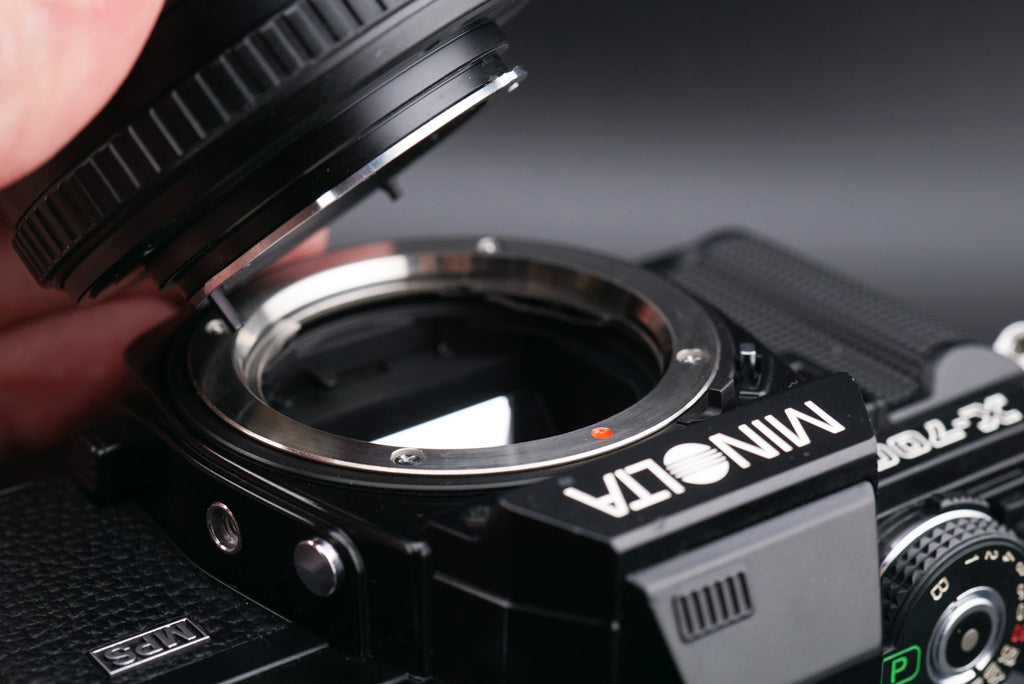
Check the photo below for an example of what the back of an MD/SR mount lens looks like.
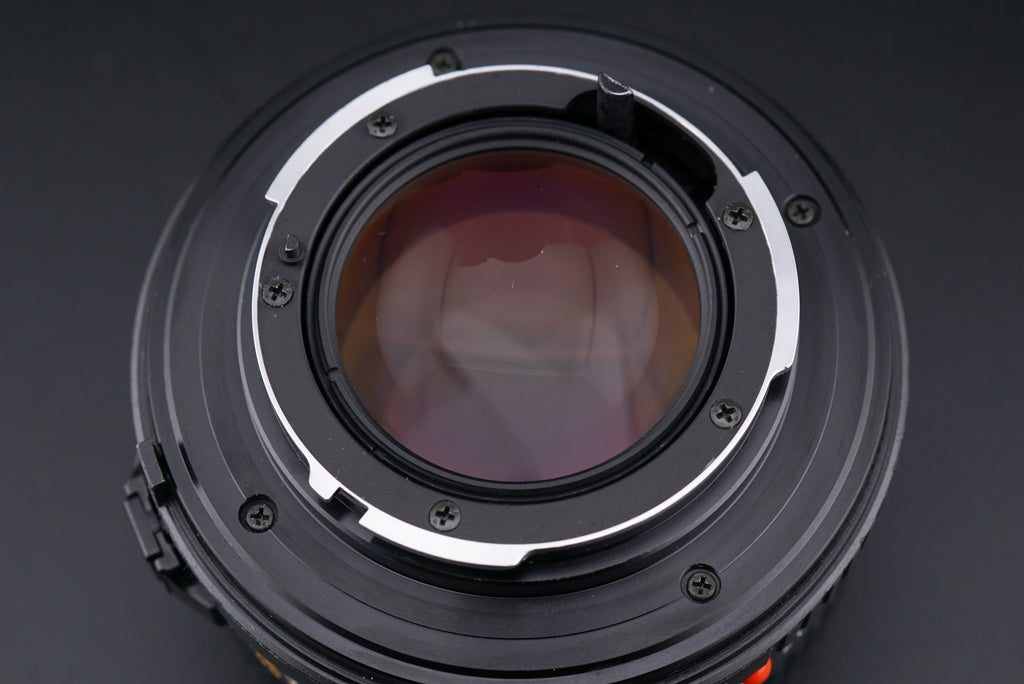
But wait, how did I look at the back of the lens?! Isn’t it on the camera? Let’s learn how to remove/attach a lens to our Minolta X-700.
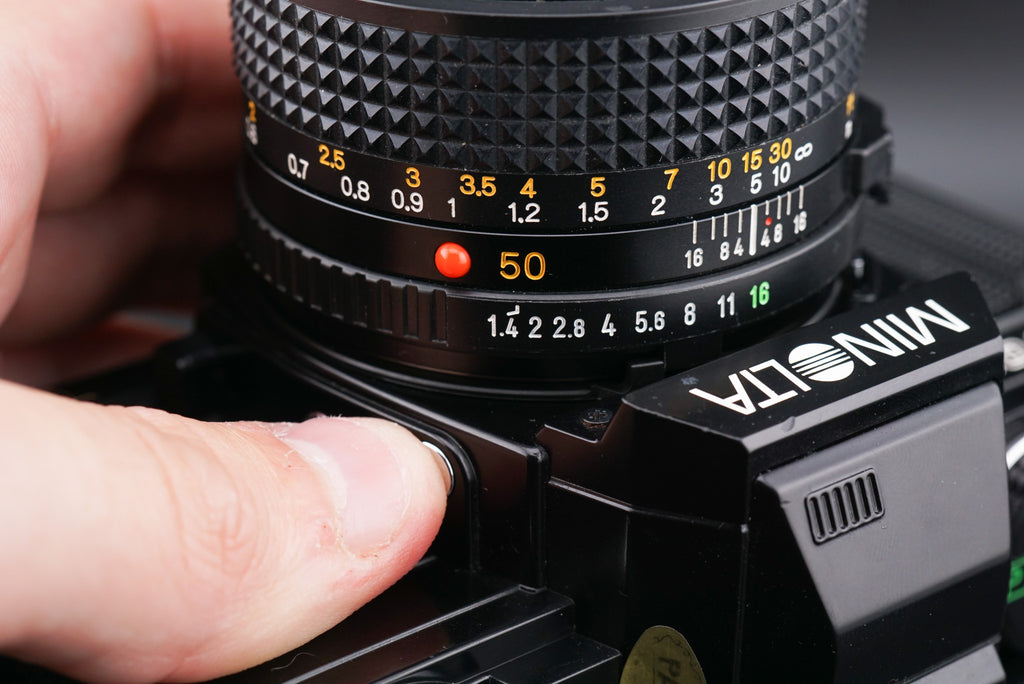
First, let’s locate the lens release button. On the X-700, it’s on the right side of the lens mount. It’s a silver button without any labeling. We hold this down, then rotate the lens counter-clockwise to get it off the body. Check the photos below for some details.
 |
 |
 |
 |
To attach a lens, we basically do these steps in reverse. You’ll want to line up the red dot on the side of the lens with the red dot on the lens mount, then rotate the lens left until it clicks into place! Minolta lenses have gone through many iterations, but most will have some form of red dot in this spot.
Hopefully, that makes sense. It’s a relatively simple operation, but maybe the video above will show it better. Next, let’s install a battery!
Installing a Battery
The Minolta X-700 uses two LR44 batteries. These are super common, and probably the most popular battery for 35mm SLRs. You can find them at your local hardware or camera store.
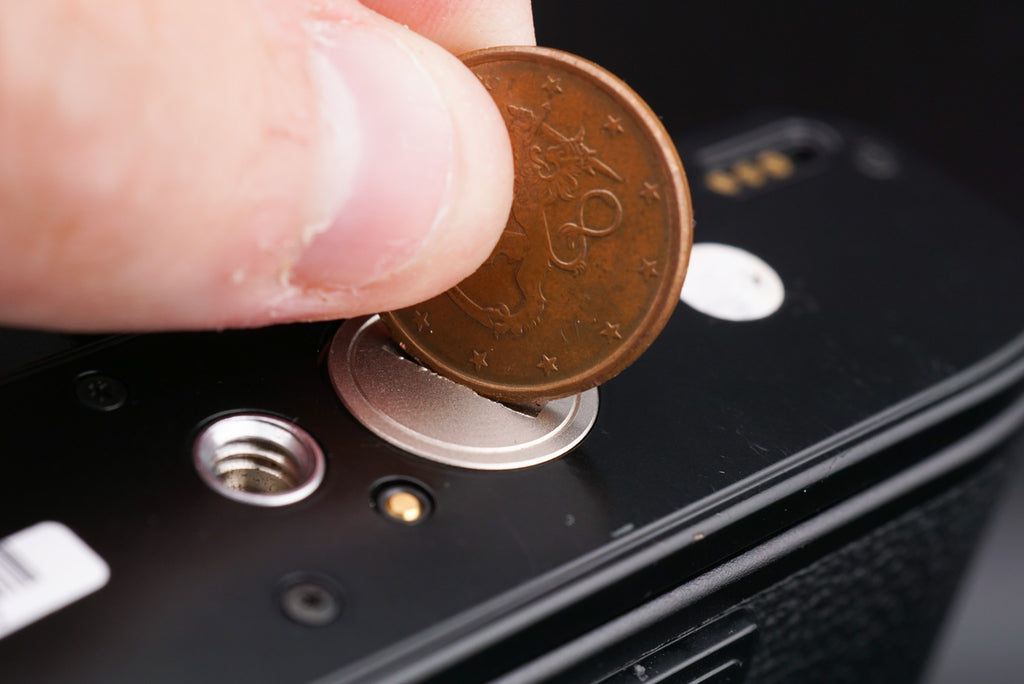
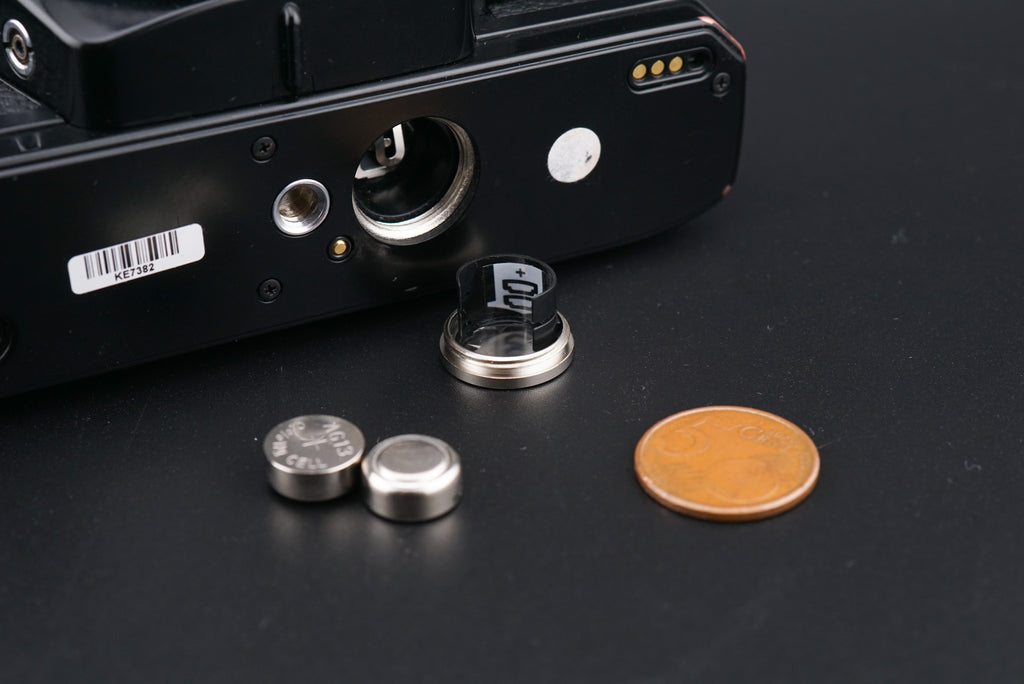
We’ll also need a coin to properly install the battery. Any thin coin will work, it just needs to fit into the slot on the bottom of the camera. Insert the coin into the slot in the middle of the camera’s bottom plate and turn counterclockwise. Eventually, the battery cover will come off.

 |
 |
 |
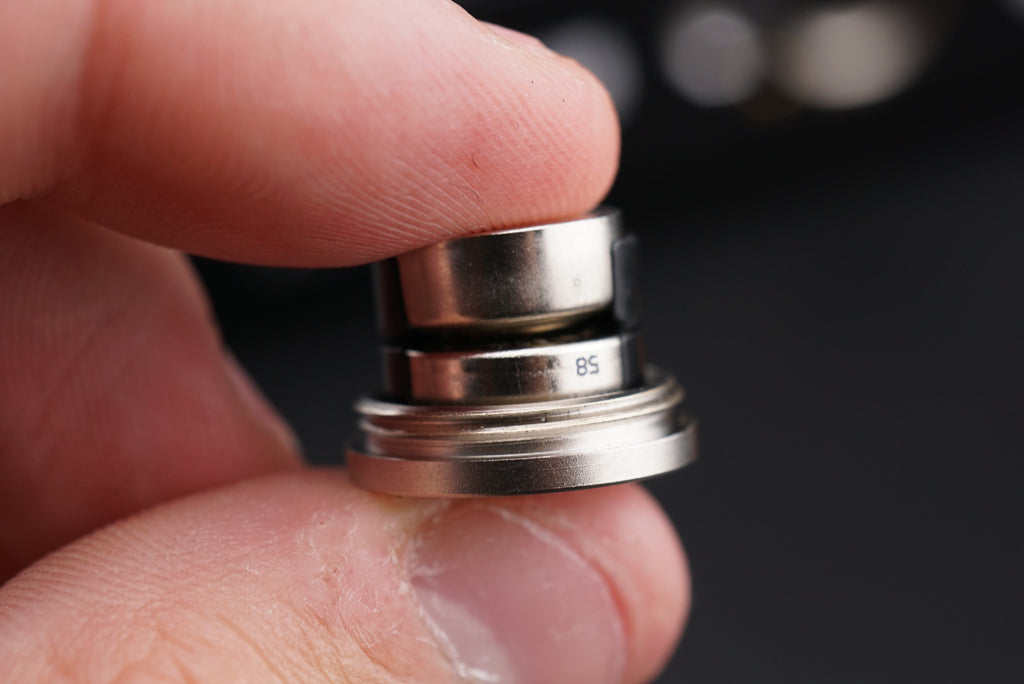 |
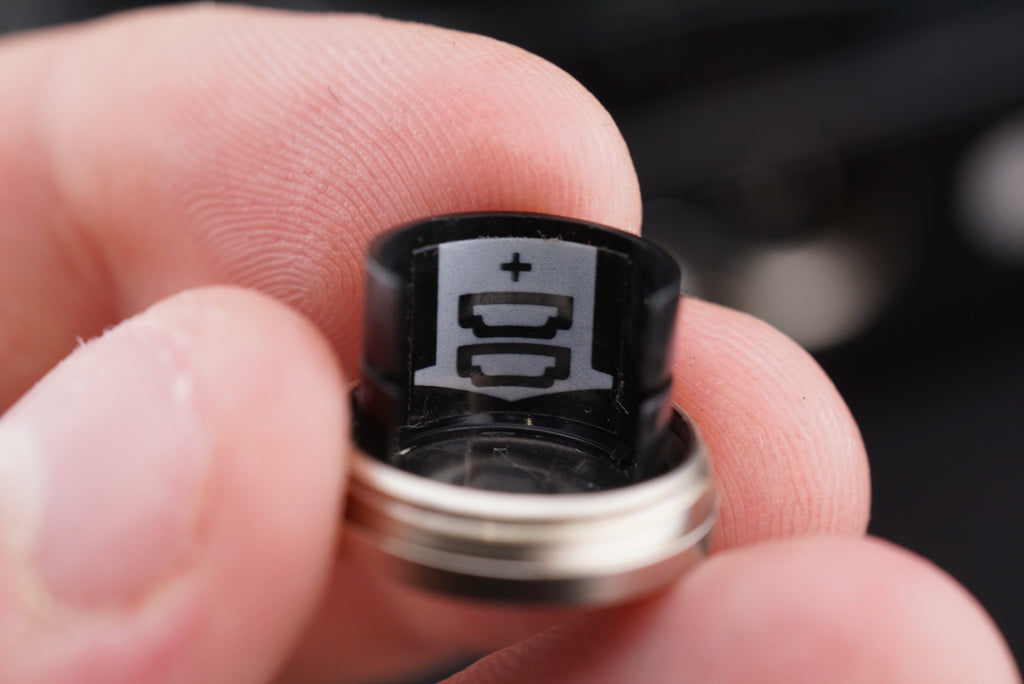
The battery has to be put in the correct orientation or electricity won’t be able to flow out of it. Luckily, there’s a handy diagram of how to put the batteries in the battery compartment. Just follow that, making sure the + on the batteries point up into the camera. Then you can put the battery inside the compartment and screw the cover back on.
Features & Identification
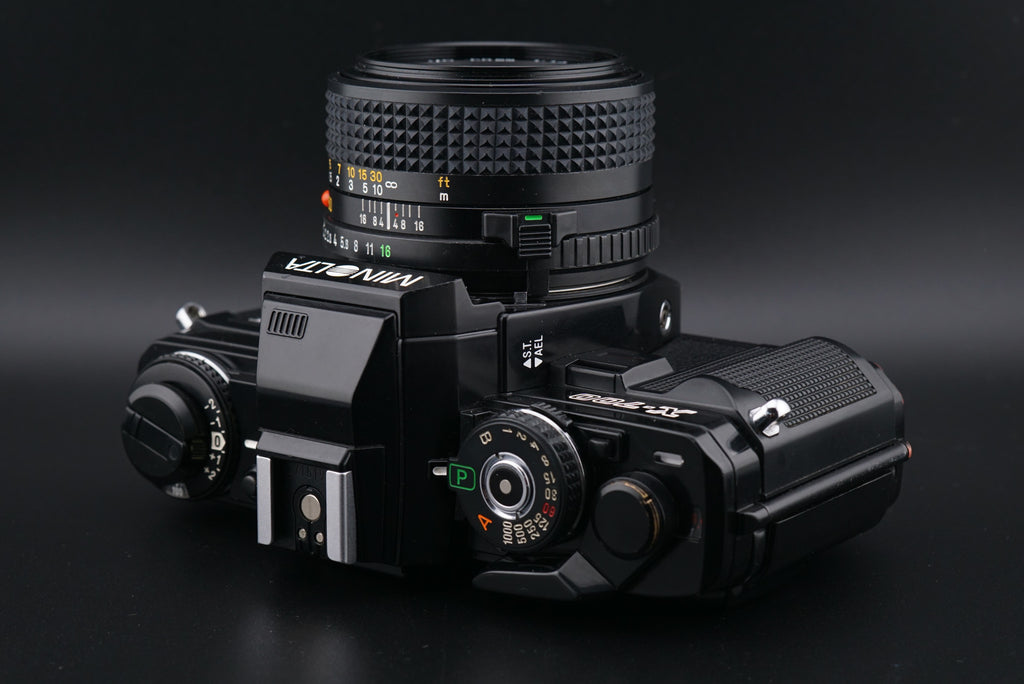
Now that we have the battery and lens installed, let’s take a look at the features of the Minolta X-700! There are a lot of dials, switches, and other things on the camera that may be intimidating, but fear not! We’ll break down everything you’ll need to know to use the camera. Let’s get started with the top of the camera!
Rewind Knob, Exposure Compensation, & ISO Dial
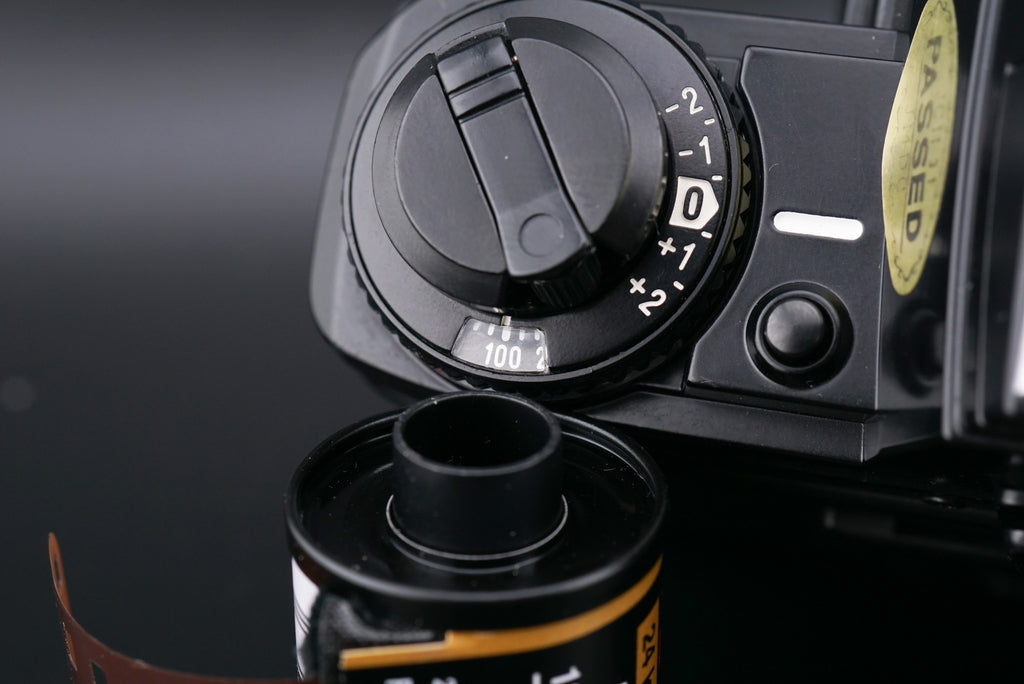
Going from left to right on the top of the camera, the first thing you’ll see is the rewind knob. We’ll use this knob when we want to rewind the film and load/unload the camera. We’ll get into the exact operation of it later, just good to know what it is for now!
Surrounding the rewind knob is a dial that contains both our ISO dial and exposure compensation controls. Let’s start with ISO.
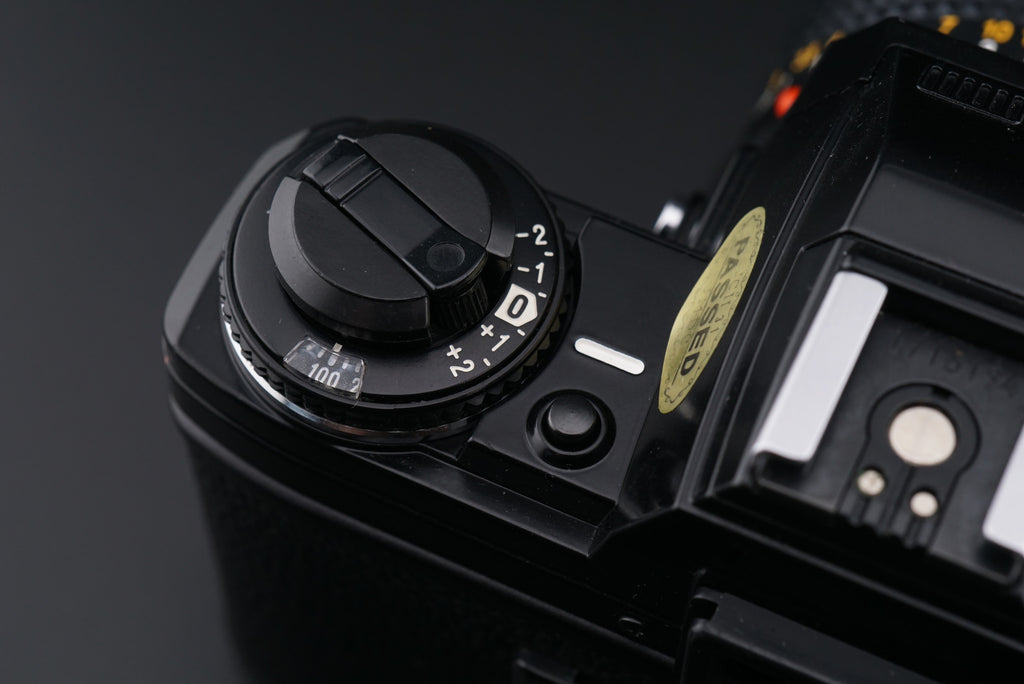
The ISO dial is very important because it tells the camera how sensitive our film is. Different films have different numbers on them, and these numbers correspond to how sensitive the film is.
To adjust the ISO dial, lift that ridged ring around near the ISO number (the 100 in the photo above) and turn. The number in the window should change.

High-ISO numbers are more sensitive, meaning they’re good for low-light photography. They don’t need as much light as other films to capture a good scene. The downside is that high-ISO films tend to have more visible grain. Play around with different films to decide which ones you like! In the beginning, though, I’d recommend you set the ISO to exactly what it says on the film canister.
Exposure compensation is a slightly different beast. This allows for temporary changes to the metering system’s sensitivity without changing the film’s sensitivity. This means that when you use aperture priority or program mode, the camera will over or underexpose to match what you set the compensation dial for.
This can be useful for creative control for specific shots. For example, turning the exposure compensation down to -1 when light is strong/contrasty in order to keep the shadows dark. Because the X-700 has an average light meter, if your scene has intense shadows and intense highlights it may end up not properly exposing anything without user adjustment. Sound complicated? Don’t worry if it doesn’t make sense. This is an advanced technique for people who have mastered the normal rules of photography and are looking for a more in-depth experience.

Viewfinder & Hot Shoe
A bit further to the right, you’ll find the viewfinder and the hot shoe. The viewfinder is where you look in order to focus and compose your photos. We’ll cover exactly what you’ll see a bit later.
Next to that is the hot shoe. This is where you’d attach accessories like a flash or external light meter. Minolta made some flashes that work specifically with the X-700, like the Electroflash 80PX, 132PX, and 360PX. These flashes will communicate with the TTL light meter in the X-700 and give you additional functionality. That being said, you can also use normal manual flashes as well. Normal flashes will only have one contact point (that connects to the larger contact on the X-700) whereas a Minolta flash will have 3 contact points (one for each contact on the X-700).
If you want to use a manual flash with the X-700, be sure to set the shutter dial to 1/60s, which is the camera’s flash sync speed.
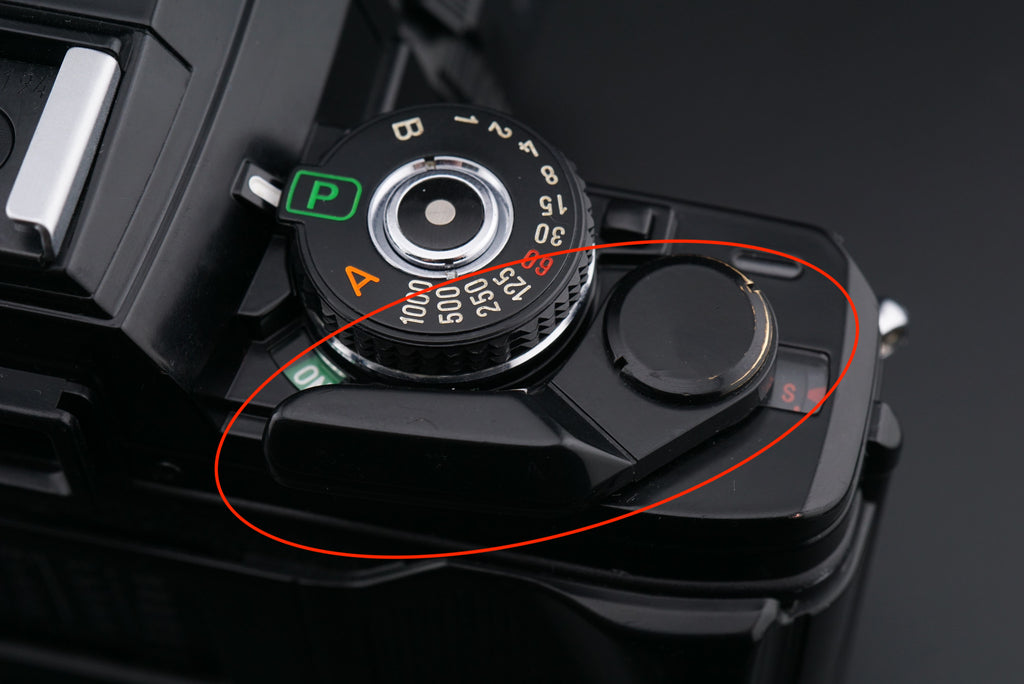
Shutter Speed Dial, Power Switch, & Shutter Button
The section to the right of the viewfinder and flash shoe houses some of the most important functions of the Minolta X-700. Let’s start with the shutter speed dial.
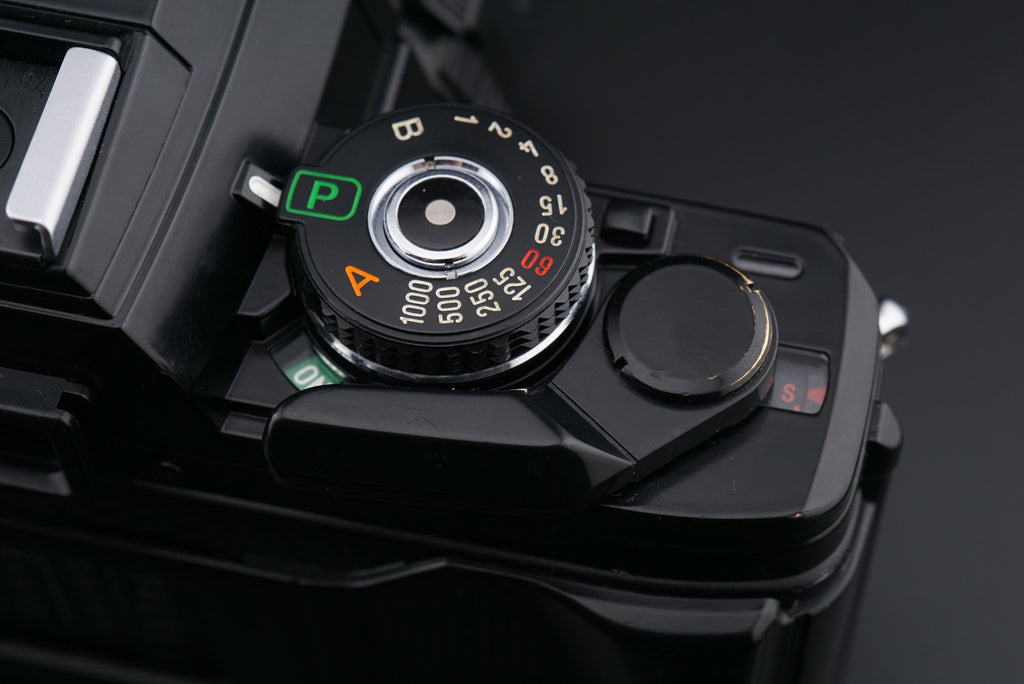
This dial contains all our shutter speeds as well as our automatic modes. It will spin freely to the manual speeds (the numbers) but will lock if you set it to “A” or “P”. If this happens, it can only be released with the rectangular button next to the dial.
The manual speeds all correspond to fractions of a second and tell us how long the shutter will be open. If you set it to 1, that means the film will be exposed to light for 1 second. If you set it to 1000, it means the shutter will be open for 1 one thousandth of a second. That’s a big difference!
By setting the dial to “A”, you put the camera in aperture priority automatic mode. In this mode, the camera will read the aperture you have selected and automatically pick a shutter speed. We haven’t talked about aperture yet, but we will soon.
By setting the dial to “P” we get program mode. In this mode, the camera can pick both the shutter speed and aperture for you, meaning you only need to focus and compose. It can be a great setting for new photographers or people just looking to take quick snapshots. Just make sure to set the lens to the smallest aperture!
Aside from those modes, there’s also “B”. This stands for “bulb” and means the shutter will stay open for as long as you hold the shutter button down. This can be useful for long exposures at night or for other creative applications. It’s moderately advanced though, so don’t feel bad about ignoring it if you’re just starting your photography journey.
Speaking of the shutter button, that’s right in the middle of the shutter speed dial. It’s a silver and black button that also has an electric sensor built in. It’ll notice when you put your finger on it and activate the light meter. Pretty cool!
 |
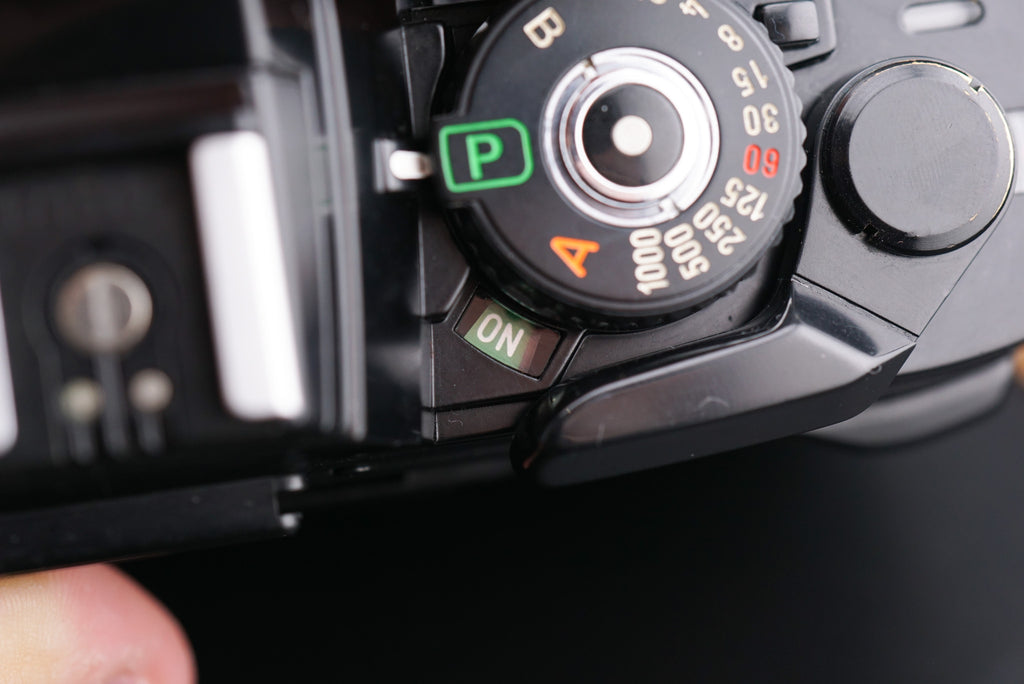 |
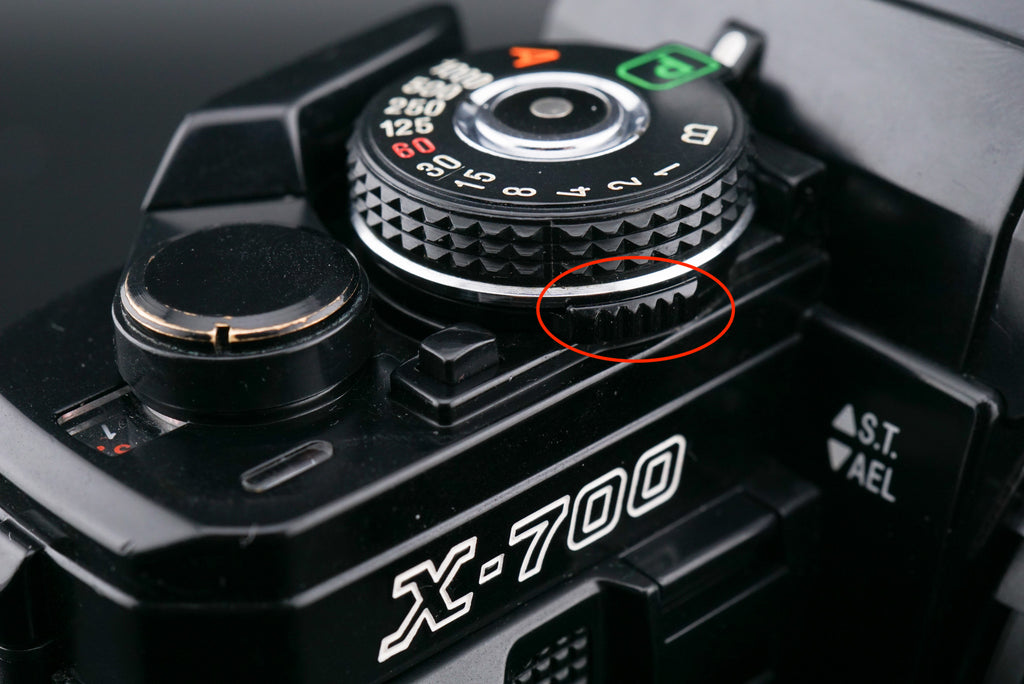
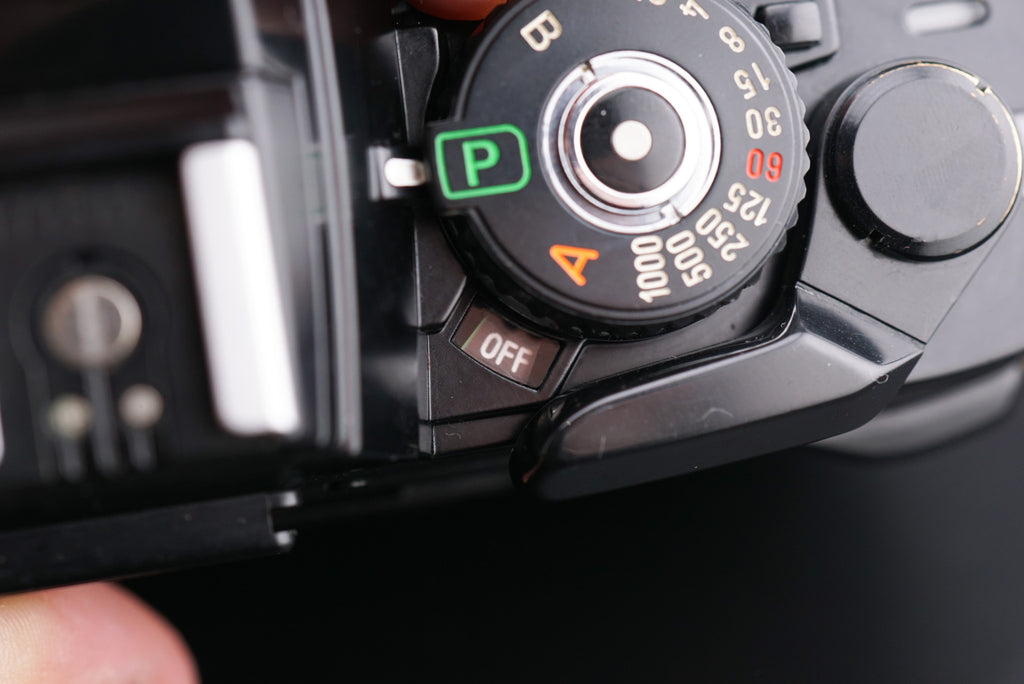
Of course, none of the above will work if the camera is turned off. You’ll notice a window below the shutter speed dial that probably says “off”. This means... That the camera is off. To turn it on, we’ll have to look at the opposite end of the shutter speed dial. There’s a small plastic tab there that changes the window to say either “On” or “On” with some audio waves. These both work, but the audio one will trigger sound cues when the camera is unable to get proper exposure with the current settings. It’s a pretty annoying noise, honestly, so I prefer to just use the camera in the non-sound mode.
Film Advance Lever & Frame Counter
To the right of the shutter speed dial is our film advance lever. This is what we use to move the film and prepare the shutter between every shot. By pulling the lever, the film moved from left to right inside the camera. If you’ve ever seen film negatives, you know that each shot appears right next to the previous one on the roll. The advance lever also primes the shutter, pulling it tight so that it can fire when you press the button.
The shutter is controlled electronically on the Minolta X-700 but the film advance lever still mechanically preps the shutter each time.
Next to the lever is our frame counter. This small window tracks how many shots we’ve taken on the roll that’s inside the camera. It counts up from “S” all the way to 36 and beyond. If your film canister says 36 photos, it’s possible to get up to 37 or even 39 if you’re careful with your loading.
Now let’s look at the lens!
Aperture Ring, Depth-of-Field Preview, & Program Lock
The aperture is an opening inside the lens that closes right at the moment when you fire the shutter. This controls how much light is let through at once, which mainly affects depth-of-field. The ring at the base of the lens controls this opening.
A larger aperture number correlates to a more narrow opening. This lets less light in, but gets more things in focus. Apertures like f8, f11, or f16 will give you a wide area of focus, which is great for landscape photography and environmental portraiture.
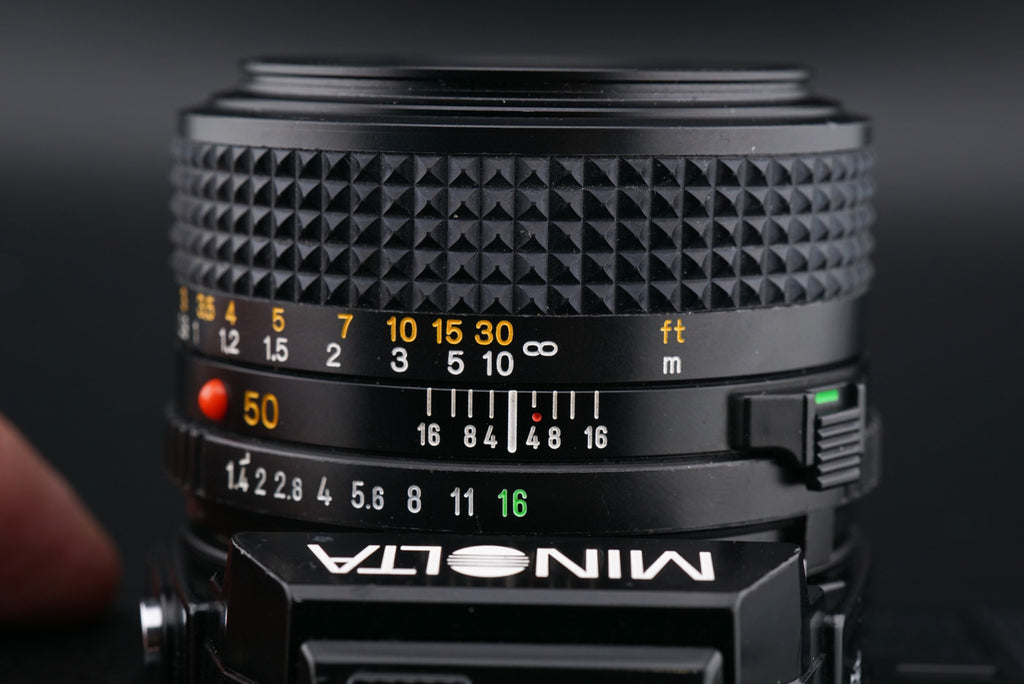
Smaller aperture numbers let more light in and contribute to a more shallow depth of field. If you’re looking for a sharp subject and a blurry background, try wider apertures like f1.8 or f2.8. Lower aperture numbers will also make it possible to take usable photos in low-light environments.
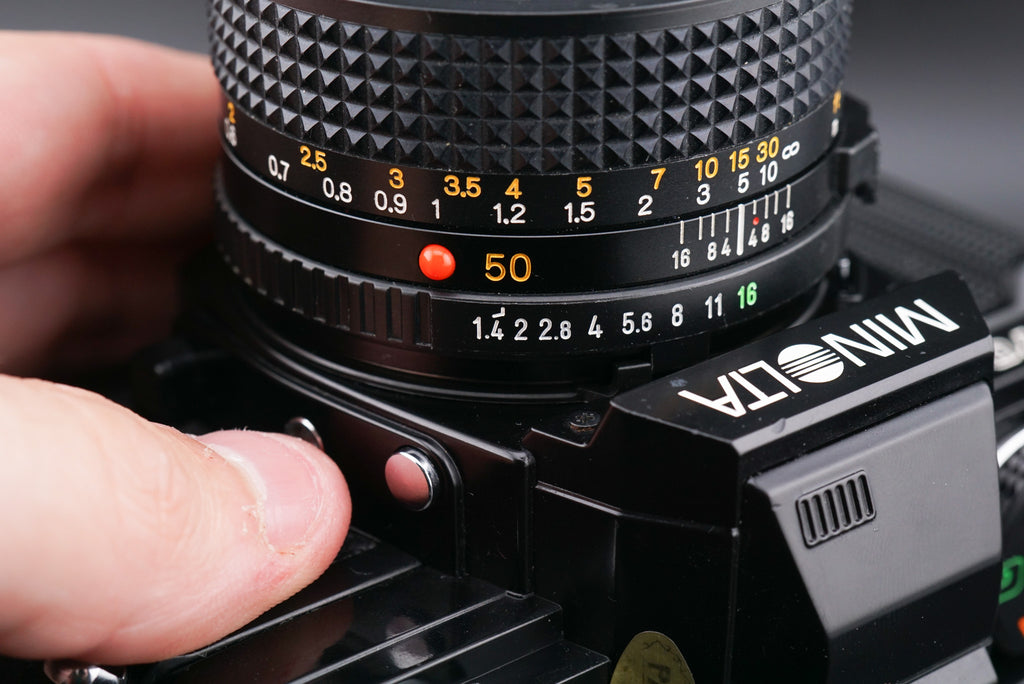
Nothing will happen when you turn the ring, but it is possible to preview your aperture before firing the shutter. To do this, press the black tab on the bottom right of the lens mount (when looking at the camera from the front). You should see the aperture close down.
To the right of the aperture ring, you’ll see a small square. This is a lock, meant to keep the lens and camera in program mode. You’ll only see this on the newest Minolta lenses, and it can only activate if the lens is set to the highest aperture number. On this 50mm lens we have, that number is marked in green as well.

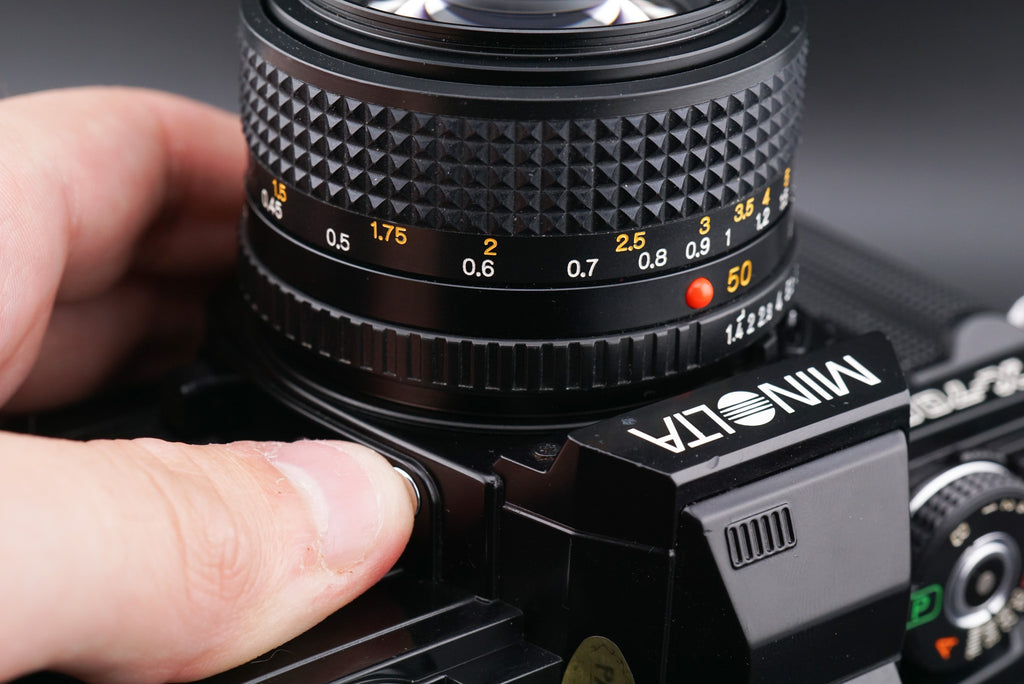
Focus Ring & Hyperfocal Scale
Above the aperture controls are the focus controls. Both the focus ring and the hyperfocal scale are used in combination to make your subject sharp and in focus. The Minolta X-700 is a manual focus camera only.
The focus ring tells us what distance is in focus. As you turn it, the number that lines up with the thick white line below is the distance your subject should be. If you set it to infinity, anything far away will be in focus. This 50mm lens can focus on anything from infinity to 0.45m, making it great for general photography and capable of decent close-ups as well.
Surrounding that thick white line are some other markings. These make up our hyperfocal scale, and can help us do some zone focusing. Just as the white line indicates precise focus, these marks indicate a range of distances at which a subject will be in focus when using a given aperture. Sounds confusing, I know. Maybe an example will help.

If you set the lens to f16, then you can use the widest lines on the hyperfocal scale to determine your focus range. If you put 10m on the mark on the right, you can see that the mark on the left is around 2 meters. That means that everything between 2m and 10m will be in focus! Hopefully, that makes sense. If not, feel free to ignore the hyperfocal scale entirely and focus inside the viewfinder only. We’ll cover that shortly!
Self-Timer & Auto Exposure Lock
On the front of the camera and to the left of the lens we have a switch and a light. This is both the self-timer and exposure lock.
To activate the self-timer, pull the switch up towards the top of the camera. There should be a red indicator showing if the self-timer is activated correctly, and the LED below it will blink red when the shutter is activated. This blinking will get faster and faster over 10 seconds before the camera takes a photo. Useful for self-portraits or group photos!
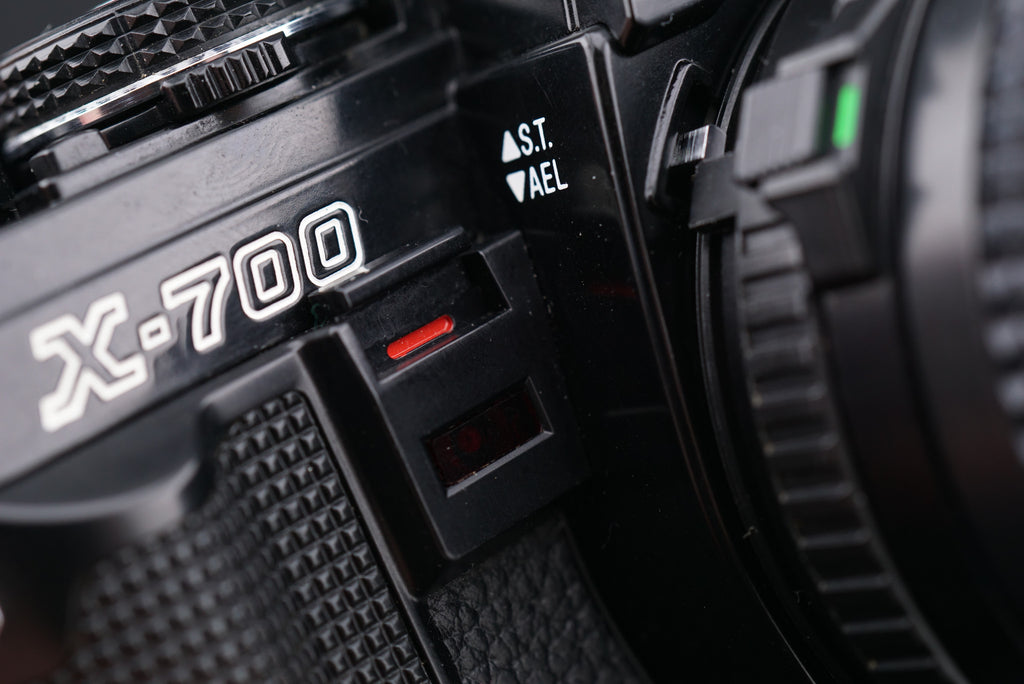
The exposure lock is a bit more advanced, requiring some knowledge of how camera meters work. When using the camera in an automatic mode, it’s possible to take a meter reading, have the camera hold onto those settings, and then actually take the photo while pointing the camera at something else. Why would you want to do that? Well, for advanced creative applications.
As mentioned earlier, the X-700’s light meter may struggle in scenes with bright lights and dark shadows. Because it tries to take an average of the whole scene, the actual exposure will end up somewhere in the middle. If you want the shadows to stay dark or the highlights to stay bright, the exposure lock can do that for you. Simply point the camera at the spot you want to be properly exposed (making sure it takes up the whole frame), push down the lock switch, reframe your photo, and press the shutter button. Be sure to hold the switch down the entire time!
PC Sync Port
Below that, almost at the bottom of the camera, there’s a small silver hole. It looks almost like a headphone jack, but this is for flash communication. Old flashes may not be able to communicate with the X-700’s hot shoe, so they’ll have to be plugged into this port with a PC sync cable. Pretty niche, since most flashes made since the 1970s will have a hot shoe contact.

On to the other side of the lens mount!
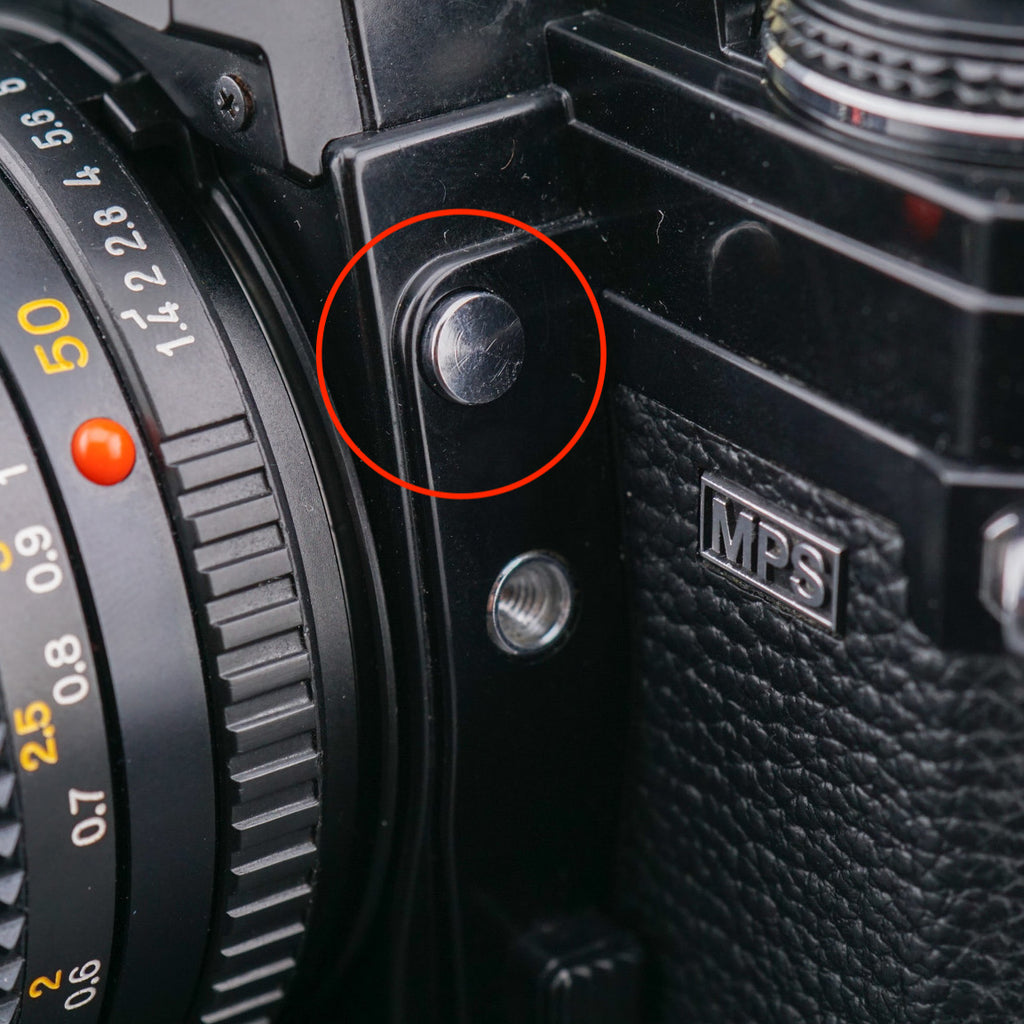
Lens Release Button, Threaded Shutter Release, & Depth-of-Field Preview
On the other side of the lens, we have the silver button we used earlier to attach/disconnect the lens. This button should be held down whenever you’re taking off or putting on a lens. Below that, though, there are a few more controls.
The small silver port below the lens release button is for a threaded cable release. Since the Minolta X-700 has that finger sensor we mentioned above, there wasn’t space for a traditional cable release. A cable like this lets the photographer fire the shutter without touching the camera. When the camera is on a tripod or you’re doing long exposures, this can be invaluable. It also lets the photographer get further away from the camera, so it can be used for self-portraits too!
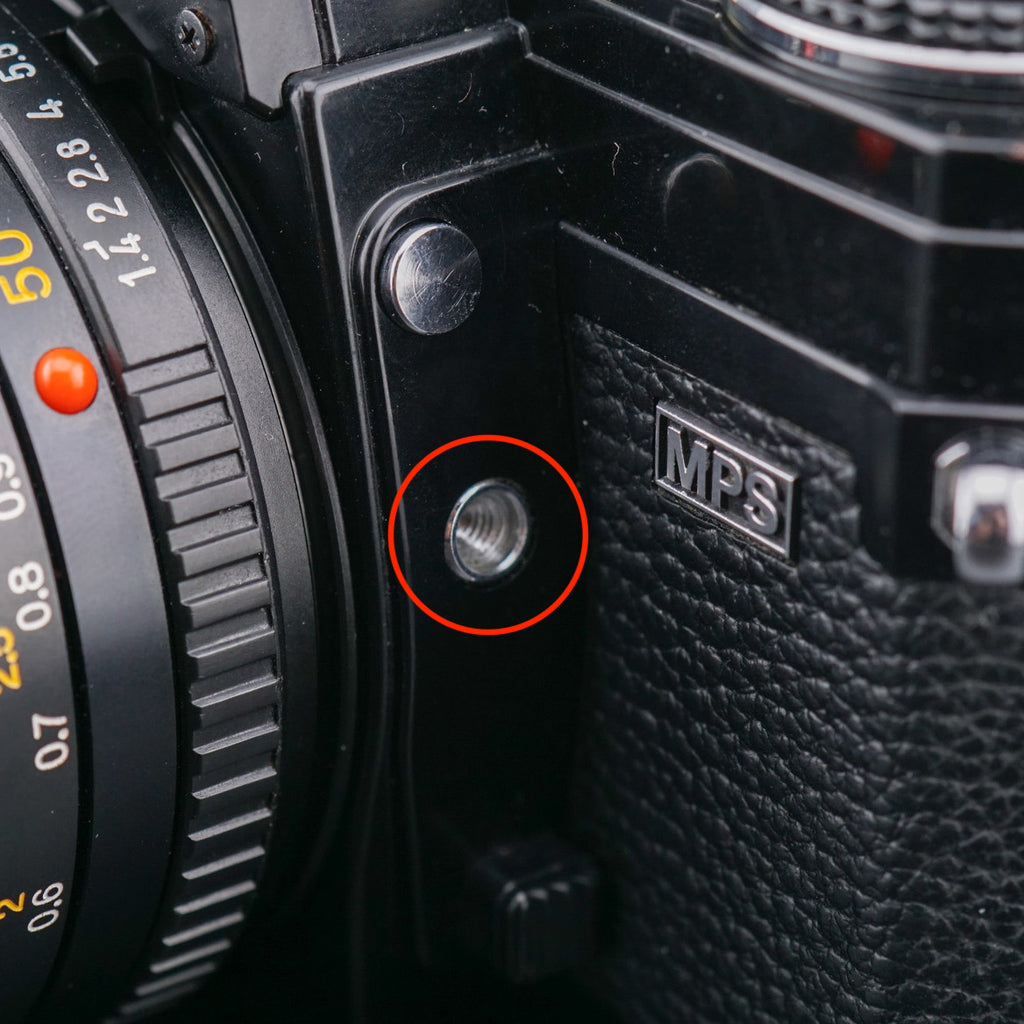
Down at the bottom is the depth-of-field preview. As I said, this black tab closes down the lens’ aperture. This can show us precisely what’s in focus when looking through the viewfinder, although it will darken the view through the viewfinder considerably.
The Bottom of the Camera
There isn’t that much to cover on the bottom of the camera, just the battery compartment and some accessory features.
The battery compartment is what we used earlier to insert our LR44 batteries. It screws on and off with a small coin. Pretty simple!
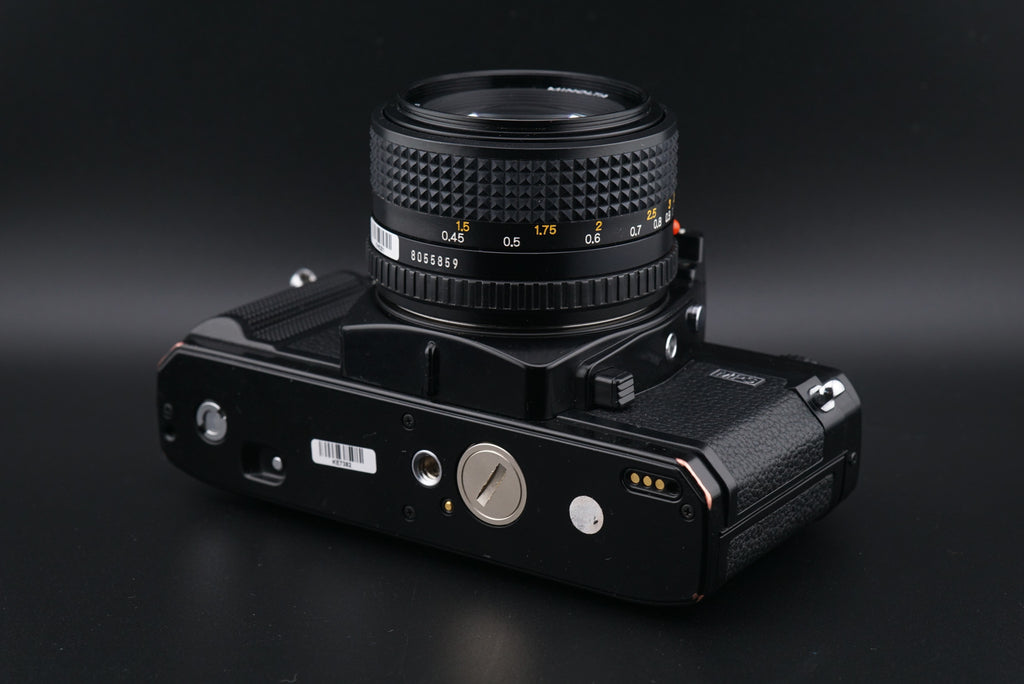
To the right of this compartment, there are 3 golden electrical contacts. These communicate from the camera to a motor drive if one is attached. Motor drives are accessory grips that automatically wind the film and advance the shutter after every shot. This makes the film advance lever unnecessary and speeds up photography in general, but they can be big and heavy and require their own batteries. Most will attach to the camera’s tripod socket but will communicate to the camera through electrical contacts or mechanical switches.
Speaking of mechanical switches, if we go all the way to the left of the bottom plate we’ll see the motor drive winder. This two-toothed circle connects with the motor drive to pull the film through the camera.
Next to that is a small, recessed silver button. This is our rewind button, and it releases tension inside the body and allows us to rewind the film once we’ve finished a roll. This is necessary because the film is held tight inside the camera while you’re shooting in order to maximize sharpness. Once this button is pressed, you can rewind the roll with the rewind knob we mentioned earlier.
That just about covers the buttons, dials, and switches of the Minolta X-700! Now let’s get into how to use it.
Camera Operation
In this section we’ll discuss how to load and unload film, what you’ll see through the viewfinder, and how to know your photos will be properly focused/exposed. From there, all that’s left is to pick something nice and take a photo of it!
How to Load Film
Loading film in a Minolta X-700 is very similar to other 35mm SLRs. If you’ve loaded one before, it’ll be easy to figure out. If you haven’t, no worries! That’s what this guide is for.
 |
 |
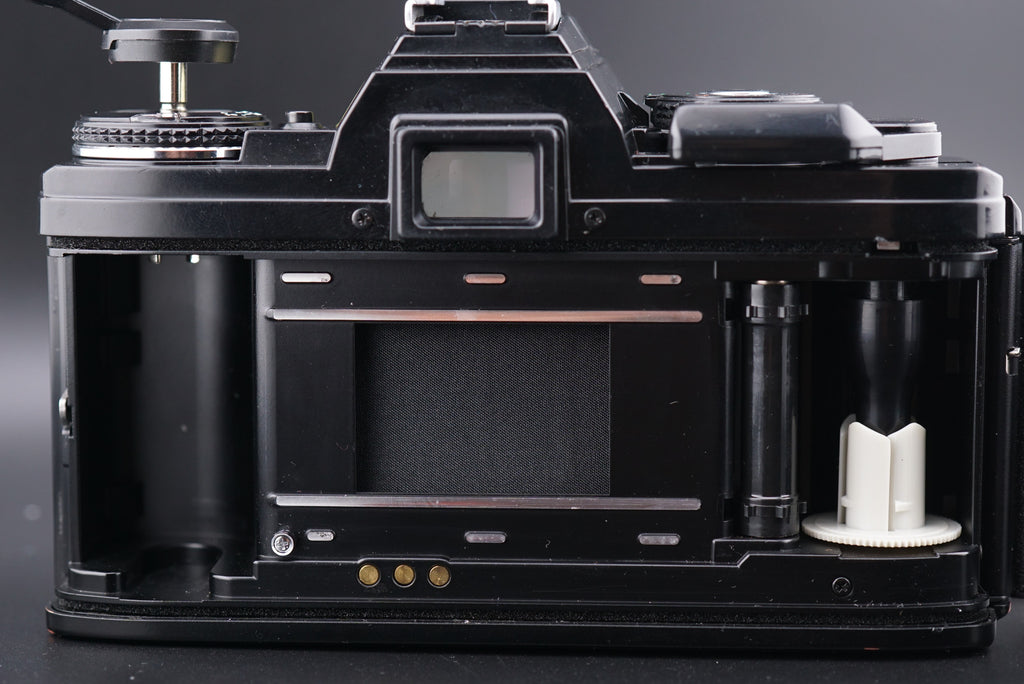
Start with the camera upside down, resting on the lens. Take the rewind knob we mentioned earlier and pull it up. It should extend a bit and then stop. Pull it a bit harder and the film back should pop open! It’s spring-loaded, so it should have quite a bit of force behind it.

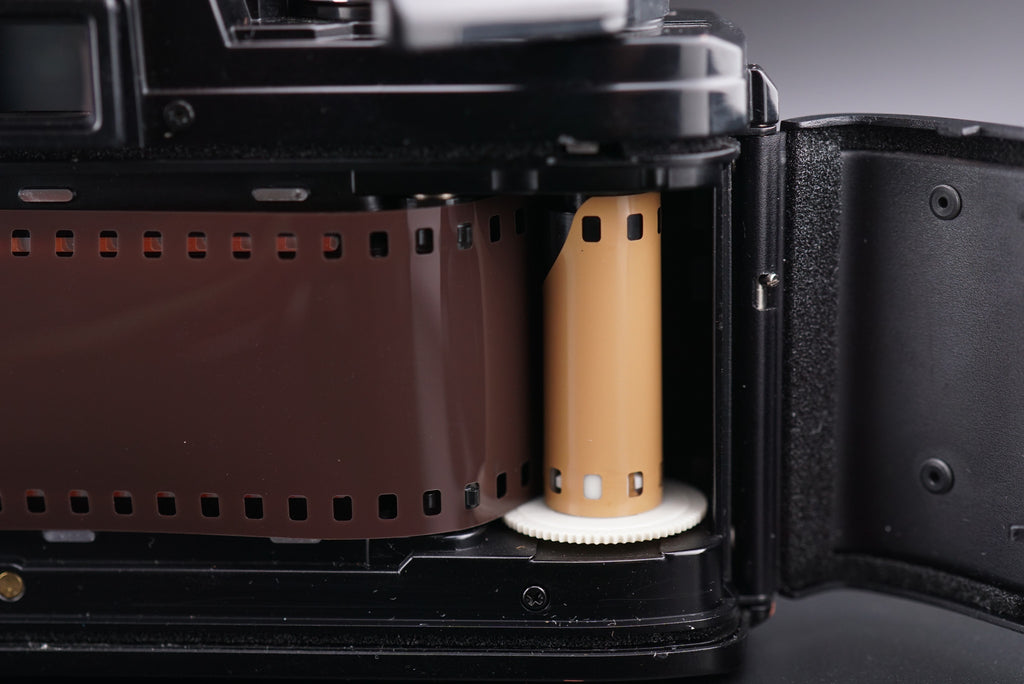
Regardless, now we can fully open the back and see the inside of the camera. From left to right we’ll see the the film compartment, shutter, advance spool, and take-up spool. All of these work in conjunction to get the film in the right position and then capture a photo on it. It’s pretty complicated, and these are just the parts that are visible!
 |
 |
Loading the camera, thankfully, is pretty simple. What you’ll want to do is take your roll of film and put it into the film compartment. You can then press the rewind knob back down, it has slots that fit into the film canister to hold it in place. Make sure you put the film canister in the same way I did in the photo below (with the canister’s “bottom” facing upwards). It won’t fit the other way, but don’t try to force it!
Next, you’ll want to pull the film leader (the thin section at the end of most rolls of film) across the shutter. Try not to touch the shutter, it’s quite sensitive. Pull the film until it reaches the spool all the way to the right.
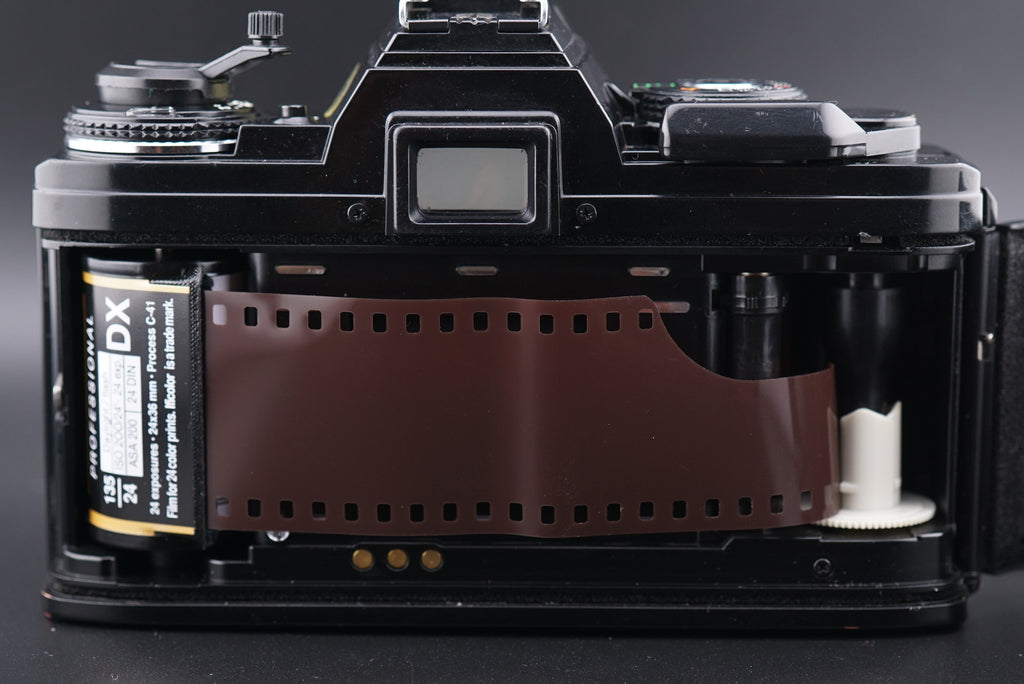
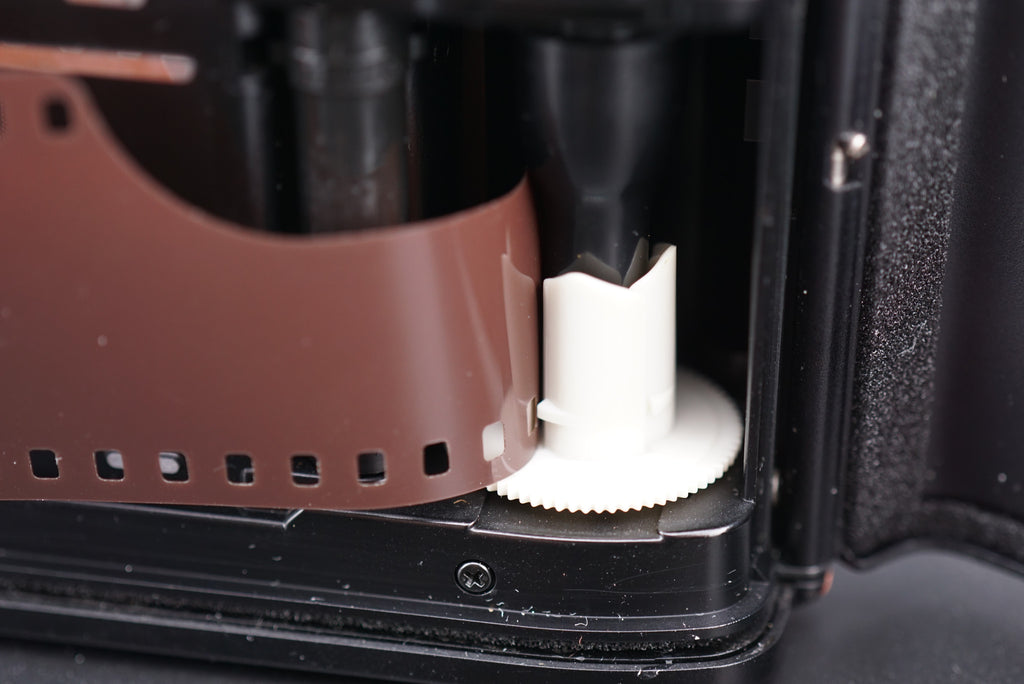
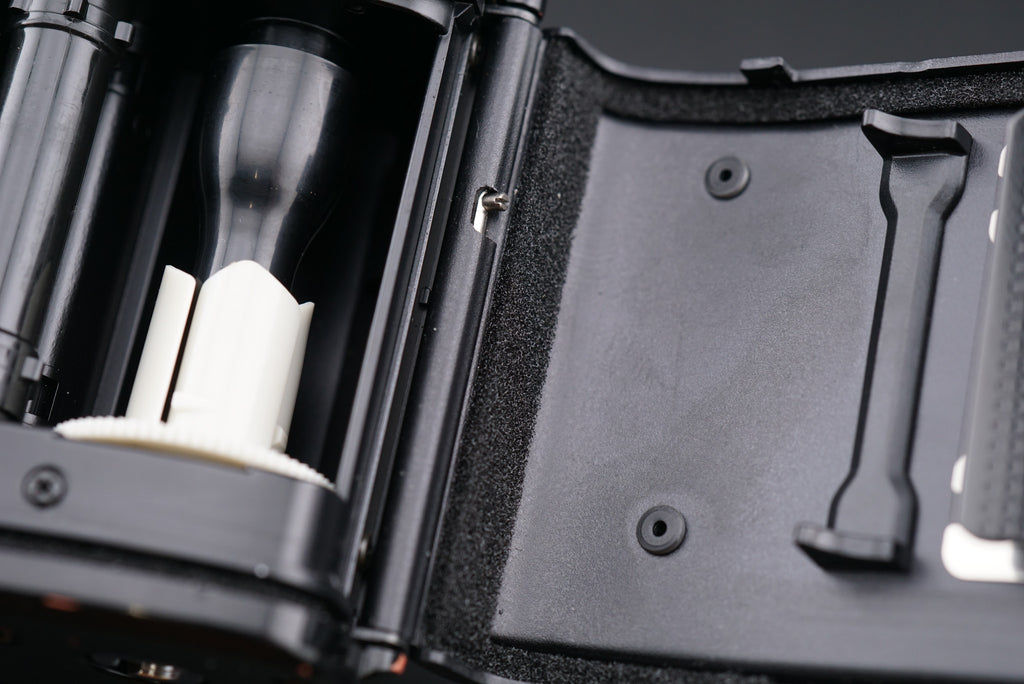
Taking a look at this spool, you’ll see it has a segmented white section on the bottom. This is what grabs the film and pulls it. For a demonstration, you can wind your film advance lever and watch the spools move. One moves left, and one moves right. So the film is pulled between them!
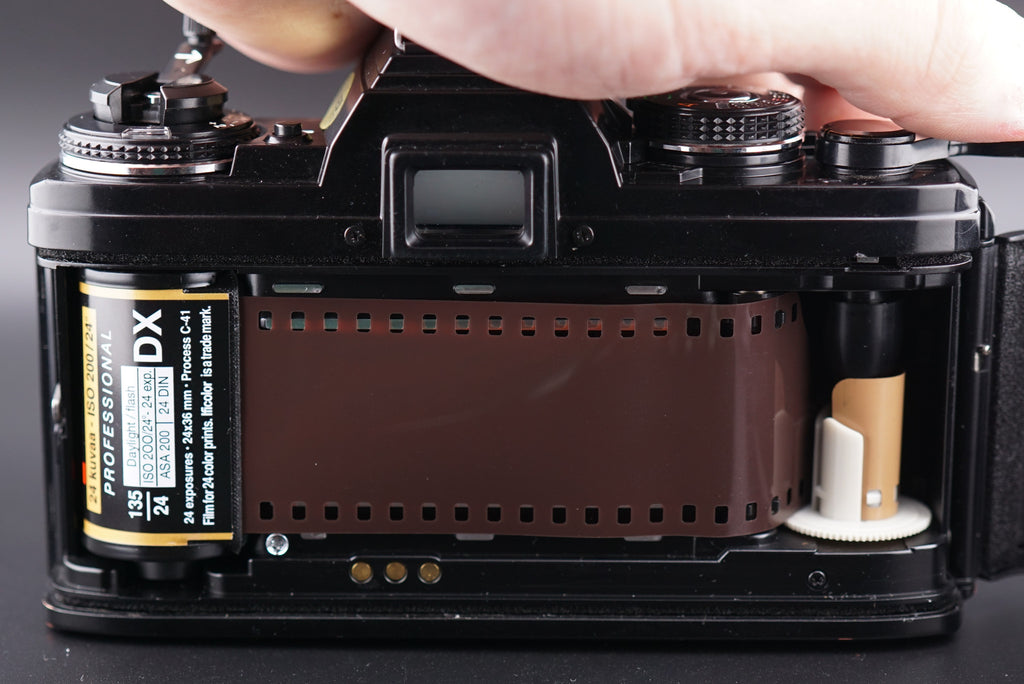
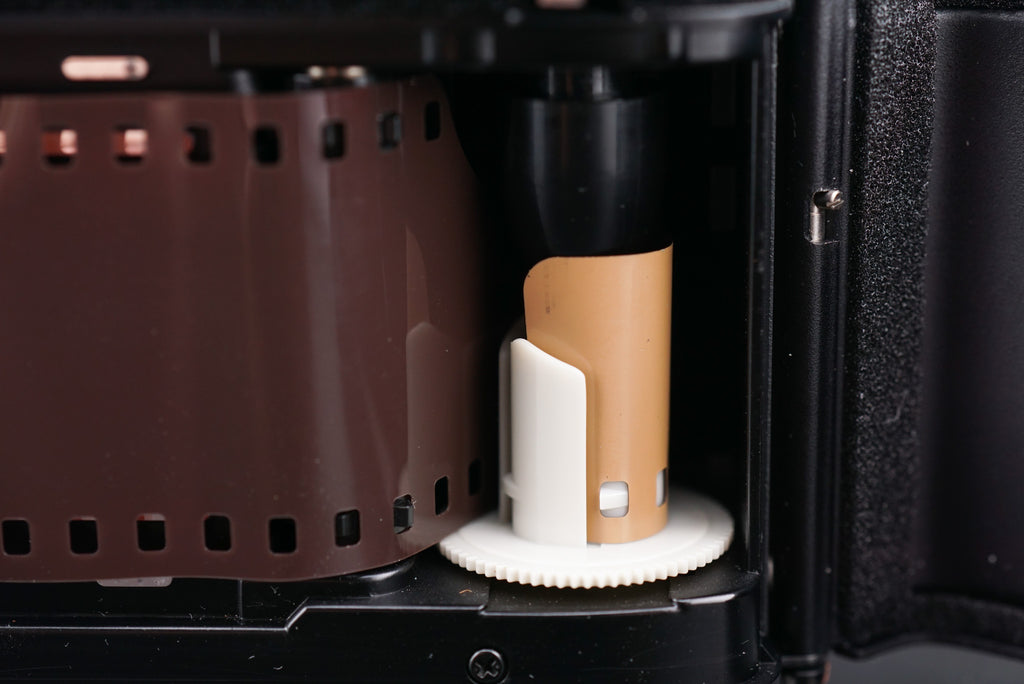
Take the film leader and push it into one of the segments, making sure the holes on the film line up with the tooth on the indent. Once it feels secure, pull the advance lever. The film should be pulled tight against the inside of the camera. If the film comes disconnected from the spool, don’t worry! It can be tricky to line it up properly. Just try again until the film is pulled successfully. You’ll be able to see the lighter-colored side of the film wrapped around the spool if you’ve done everything right.
 |
 |
 |
 |
If this isn’t your first roll, you can close the film back here. But for a first-time user, I would recommend firing the shutter and winding the film one more time just to be 100% sure your film is attached properly. You’ll lose a shot or two from your roll, but that’s better than losing an entire day of memories because the camera wasn’t loaded properly, right?
Once you’re confident that your camera is loaded properly, close the film back. It should click back into place. Now we can pick the camera up and look at the top plate. Specifically, we want to look at the frame counter.
We need to advance the film and fire the shutter until the frame counter’s indicator lines up with the number 1. This will make sure our first actual shots don’t have light leaks from our loading procedure. After that, you’re ready to take photos!
How to Rewind & Unload Film
Basically, rewinding film is the same process but in reverse! Okay okay, there are a few extra steps.
You’ll know you’ve finished the roll because you won’t be able to advance the film anymore. It’ll feel quite tight and resistant. Don’t force the advance lever or you could rip the film!
Once the roll is done, you can rewind it. To do this, press the rewind button on the bottom of the camera. Then we can use the rewind knob to rewind the film. It makes it a lot easier if you flip out the rewind knob’s lever arm.
It may take a while to rewind the film, but eventually, you should hear a small click and notice that there’s much less resistance on the rewind knob. This means that the film has disconnected from the take-up spool! Just rewind a bit more and the film should go entirely back into the canister, just how a lab would want it. Once you feel confident the film is fully rewound, you can open the film back (just like before) and remove the canister!
With that, you’re totally ready to bring your film to a lab for processing! Congratulations, you’ve successfully loaded, shot, rewound, and unloaded a roll! But wait, we haven’t talked about the actual shooting part yet.. Okay, let’s get inside the viewfinder!
The Viewfinder
The camera’s viewfinder tells you what the photo will look like when you take the photo. Since the Minolta X-700 has a light meter, it can also tell us whether or not our photo will be properly exposed. A lot of information is conveyed by the viewfinder, so it’s important to understand what the camera is telling you. Let’s start with focusing.
Focusing Aid (Split Prism)
In the center of the viewfinder there should be a focusing aid of some kind. All X-700s have a “split prism” surrounded by “microprisms”. All these prisms are meant to help you get your subject in focus so they’ll be sharp in the finished photos.

The split prism is the circle in the middle with a horizontal line through it. If you rotate the focus ring on the lens while looking through the viewfinder, you should see the top and bottom sections of this split prism move left and right. Your goal is to make the top and bottom line up! If you do that, whatever is in the center of the frame will be in focus.

Try focusing on something close to you and then pointing the camera at something far away. Even if the split prism is lined up correctly for the close object, it won’t be lined up for the far-off object. You’ll need to refocus on subjects at different distances.
Surrounding the split prism is a ring of what are called microprisms. These help with focusing just like the split prism, but in a different way. If you look at an out-of-focus object through the microprisms, you’ll notice a “texture” on the object. The more out of focus, the stronger this texture. To achieve proper focus with the microprisms, rotate the focus ring until the object appears normally.
By using these two focusing aids (and some practice) you should be able to quickly and easily focus on most things! Now that we’ve got the subject in focus, let’s make sure the photo will turn out properly by looking at the light meter.
The Light Meter & Judas Window
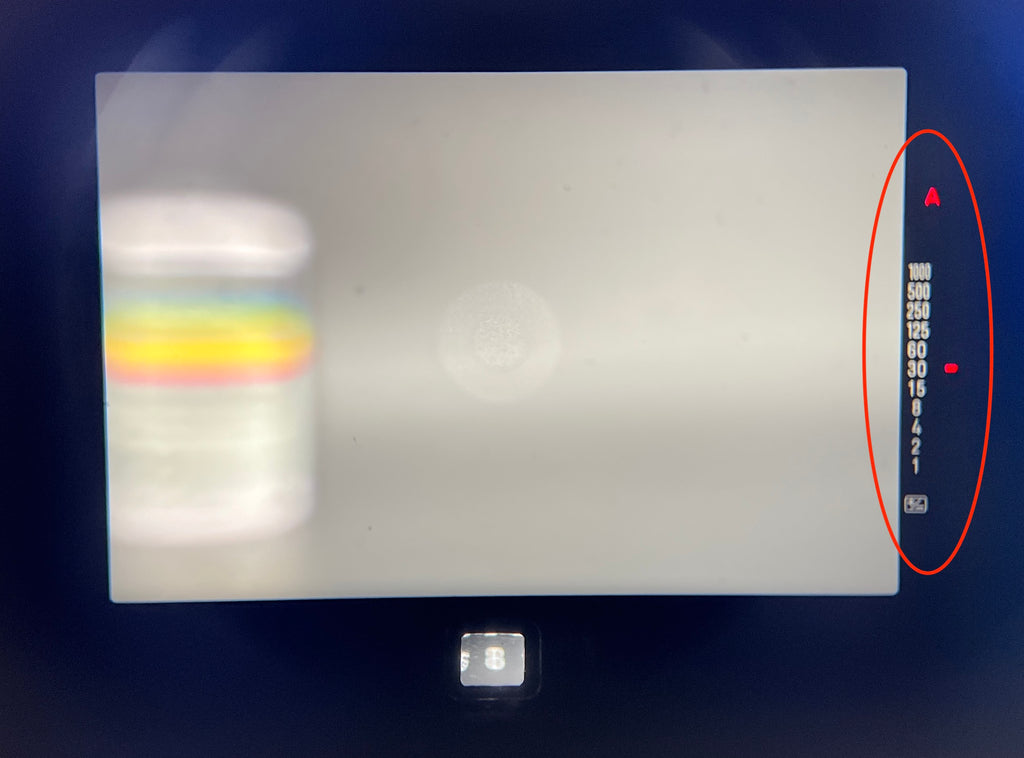
The light meter in the Minolta X-700 is a series of LEDs that show up on the right side of the viewfinder. Each LED correlates to a different shutter speed, which is the camera either recommending a speed or telling you which speed will be used. There are also various indicators to tell us what mode we’re in and other settings.

As I said, the viewfinder has a series of shutter speeds running down its right-hand side. The full range of shutter speeds are here, so the camera is able to tell you specifically what shutter speed to use. As you change your aperture or point the camera at different light levels, the LED light should move up and down to different shutter speed settings.
When the camera is set to manual mode, a red “M” will appear above the shutter speed readout. This means that the camera is in manual mode and the LED next to the shutter speed is the camera’s suggestion based on the current aperture, ISO, and light level.
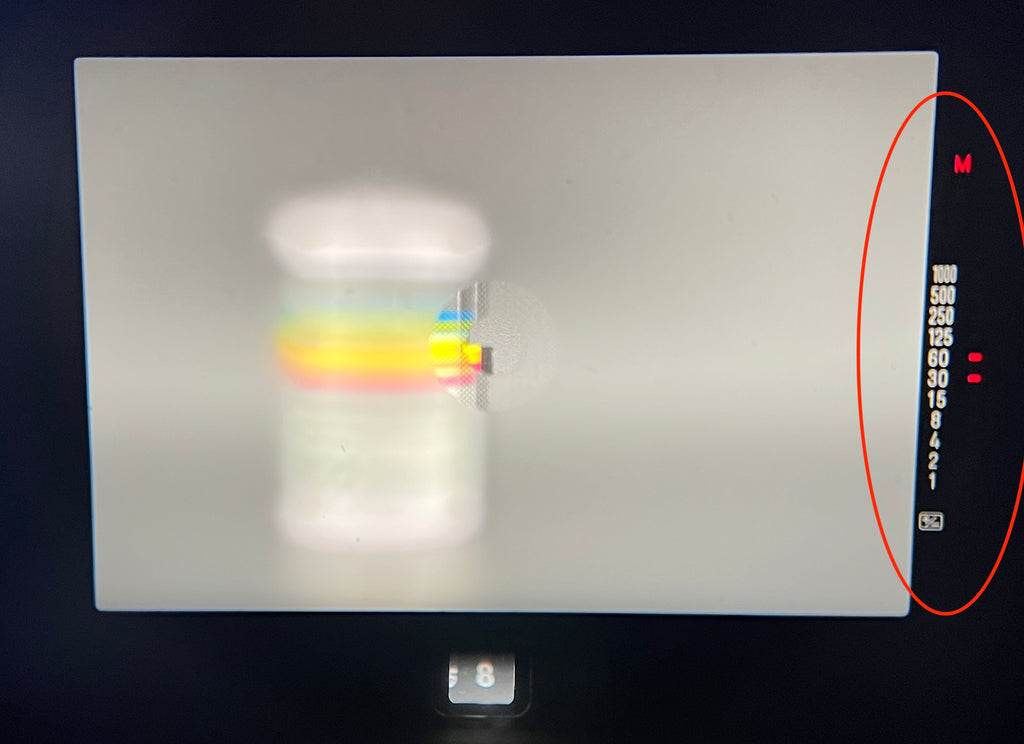
One of the most unfortunate things about the Minolta X-700 is that your chosen shutter speed is not displayed in the viewfinder in manual mode. Only the camera’s suggestion is visible. That means that, in manual mode only, you have to take your eye away from the viewfinder to make sure that you have the right shutter speed selected. It’s a bit of a pain and something Minolta fixed in later cameras like the X-500.
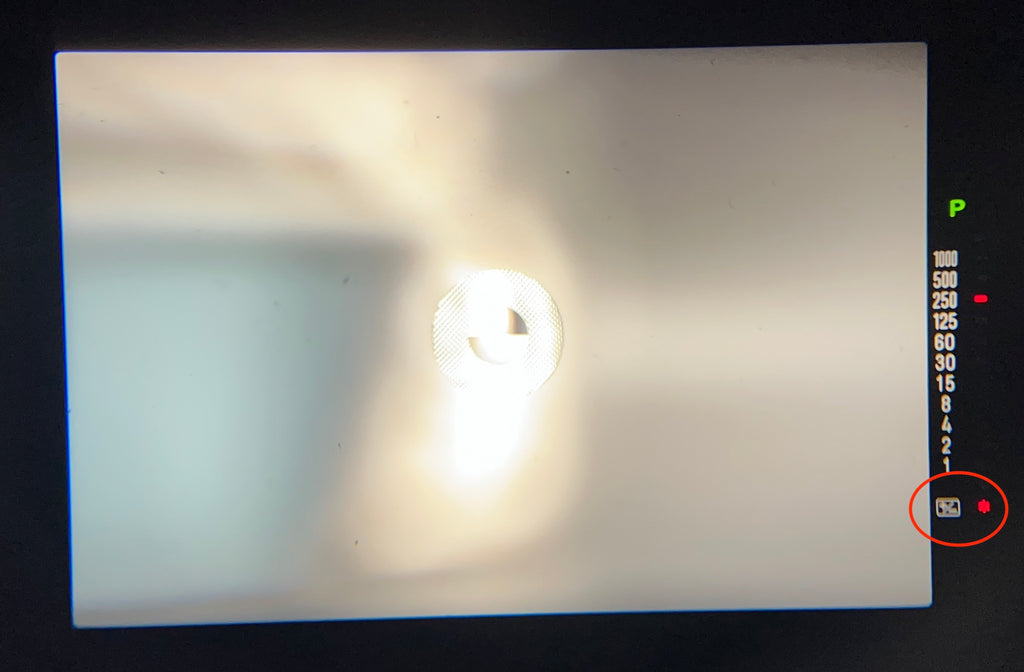
If you put the shutter speed dial into aperture priority mode, an “A” will appear in place of the “M”. Now the shutter speed LED indicates which speed the camera will pick for you. Since we’re in an automatic mode, there’s no need to take your eye away from the viewfinder to adjust the shutter speed and aperture is visible through the Judas window in the bottom.
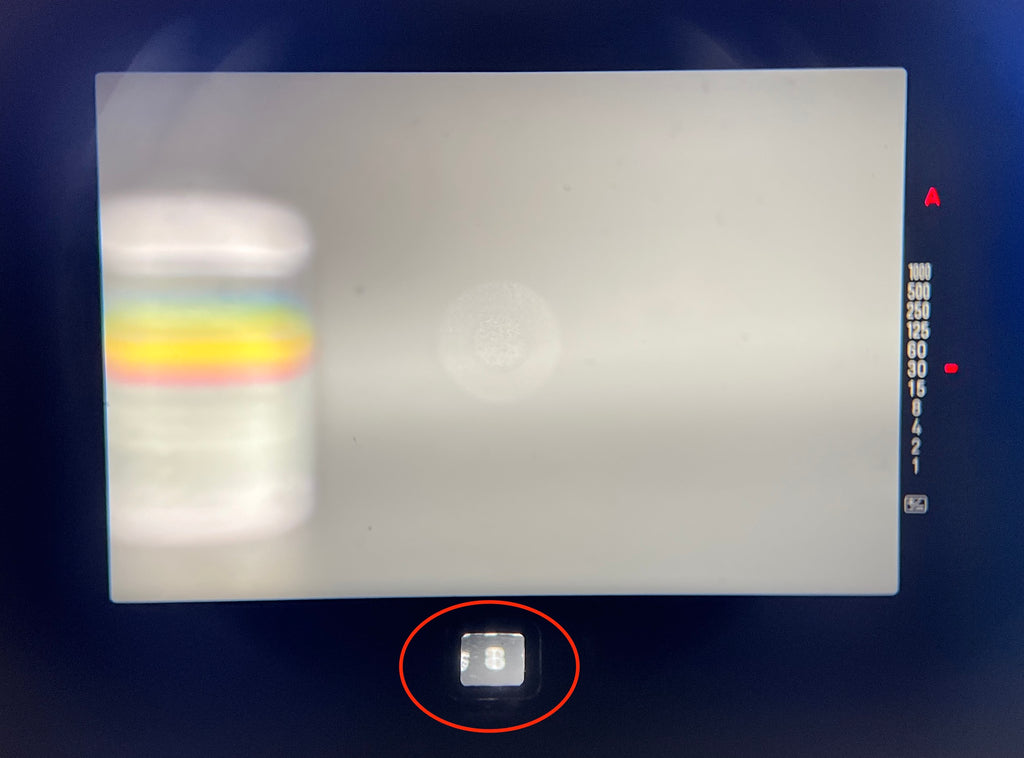
Wait, Judas window? What’s that? Well, it’s a small hole in the camera’s viewfinder that points directly at the top of the lens. You can see the hole in the bottom center of the finder, and it should show you what aperture setting you have selected. If you take the lens off the camera and look under the Minolta logo you should be able to see the window. It’s a simple technology that can be very helpful for quickly making sure your settings are correct!
In A mode, you only need to pick an aperture and the camera will pick a shutter speed for you. So play around with different apertures and see how the light meter reacts as well as how the photos differ. As we said earlier, a small aperture number means a shallow depth of field, which is great for low light or for creating a blurry background. And vice versa for large aperture numbers!
Now for program mode. This was the big selling point of the Minolta X-700, as it made SLR photography extremely accessible, fast, and beginner-friendly. If you put the shutter speed dial to the P setting and set the lens to the largest aperture number, a green “P” will show up where the “A” was. If you forget to change the lens’ aperture (or your lens isn’t compatible) the “P” will blink on and off. It should be a quick way to make sure you have your camera set up properly!
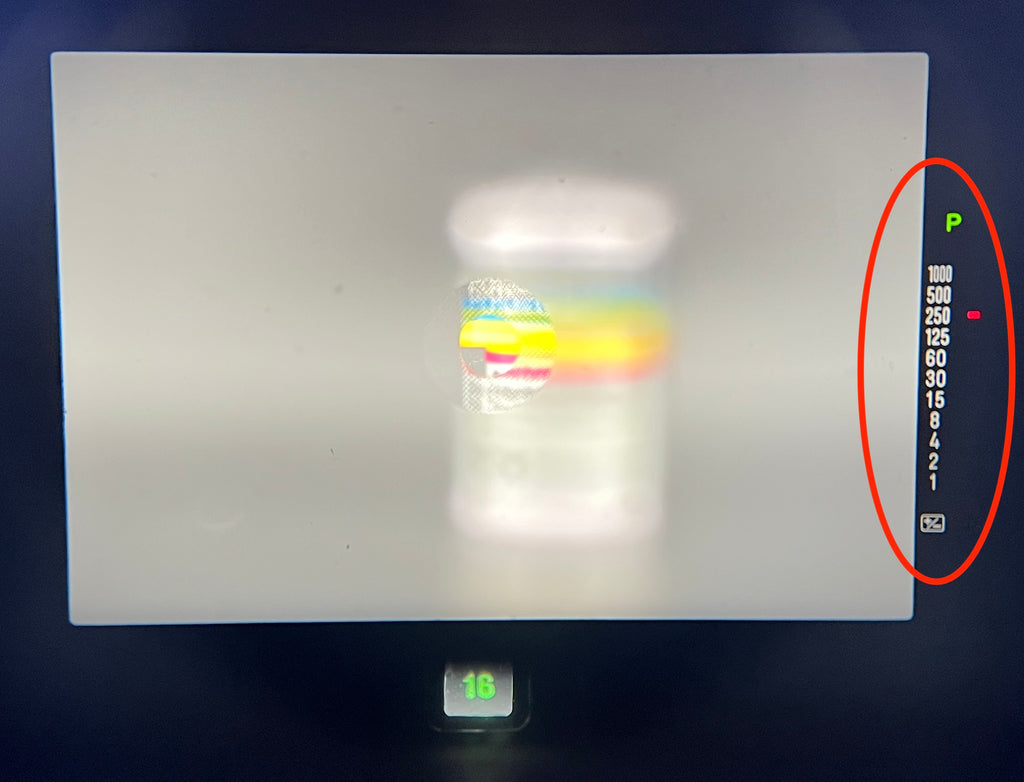
In “P” mode, the LEDs will still show you what shutter speed the camera will use. Unfortunately, the camera has no way of showing what aperture it will select so you’ll have to trust it to make the right decision. Most Minolta X-700s are still accurate even after decades of use, so you can trust them to work for the most part.
The only other thing in the viewfinder is the +/- sign below the shutter speed dial. What’s that? It’s the indicator that exposure compensation is being used. Unfortunately, the camera can only tell us whether or not exposure compensation is in use. It can’t tell us how strong the effect is, so we have to take our eye away from the viewfinder to check. This is because exposure compensation isn’t meant to be left on permanently, only added for creative effect on one or two shots. The camera just wants to make sure you know that it’s on!
Common Issues & Conclusion
The Minolta X-700 is a cleverly designed camera packed full of features meant to make photography simple. It can be an excellent first camera for those looking to dive into SLR photography, but can also be a workhorse camera for an advanced amateur or even professional! That being said, it’s important to ensure your camera works properly.
If an X-700 hasn’t been used in decades, there are a few things to check. #1 is to make sure the shutter fires at all. Since it’s necessary to put batteries in the camera to check this, we recommend bringing batteries with you if you’re buying an X-700 secondhand. Check the battery compartment for any rust or corrosion residue, as this can cause serious issues to the camera’s performance.
Another thing is to look at the light seals. If you’re buying from a non-camera store, these will 100% need to be replaced. These are the foam seals that exist around the edges of the film chamber inside the camera’s back. They degrade over time, and if an X-700 still has the original seals you’re likely to run into light leaks and possibly ruin a few shots or even an entire roll. It’s not a hard repair to do this yourself, but you do need special foam and glue. We sell it on our site if you’re interested!
It’s also worth checking to see if the viewfinder LEDs are working properly and if the camera is firing at different shutter speeds in different light conditions. Even without a lens, the camera should fire at a slow speed in dark light and at a fast speed in bright light.
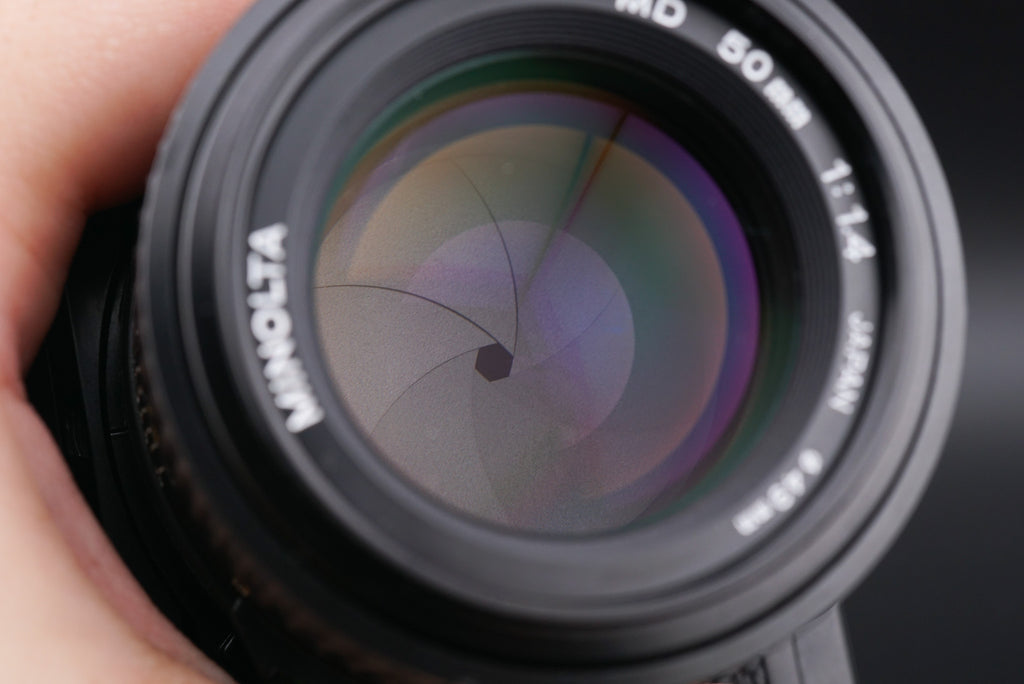
Speaking of the lens, it’s also important to check that. You can take the lens off the camera and shine your phone’s flashlight through it. This will illuminate any issues that may exist inside the lens. Some dust inside the lens isn’t an issue, but if you see something that looks foggy or something that looks like spiderwebs, that’s an issue. The spiderwebs are fungus, and this will grow over time and can possibly even spread to the camera itself. Not fun.
If you feel like you just want a camera that works, you can always check our website. We have trained mechanics who inspect and repair X-700s every week. It costs a bit more, but it can save you money in the long run and give you a welcome peace of mind.
Otherwise, that’s been a (not-so) brief overview of the Minolta X-700. Thanks for reading and I hope you learned something! If you have any questions at all about using your camera feel free to reach out to us on Instagram (@Kamerastorecom), via email (info@kameratori.fi), or via the chat function of our website. We’re always happy to help. (-:


